The box model
盒模型
在CSS中,所有元素都被一个个”盒子(box)“包围着。
外部显示类型
这是两种被广泛使用的”盒子“,这两种盒子会在页面流(page flow)和元素之间的关系方面表现出不同的行为:
一个外部盒子被定义成块级(block)的盒子会表现出以下行为:
- 盒子会在内联的方向上扩展并占据父容器在该方向上的所有可用空间,在绝大数情况下意味着盒子会和父容器一样宽
- 每个盒子都会换行
width和height属性可以发挥作用- 内边距(padding), 外边距(margin)和 边框(border)会将其他元素从当前盒子周围“推开”
除非特殊指定,诸如标题(
<h1>等)和段落(<p>)默认情况下都是块级的盒子。
如果一个盒子对外显示为inline,那么他的行为如下:
- 盒子不会产生换行。
width和height属性将不起作用。- 垂直方向的内边距、外边距以及边框会被应用但是不会把其他处于
inline状态的盒子推开。 - 水平方向的内边距、外边距以及边框会被应用且会把其他处于
inline状态的盒子推开。
用做链接的 <a> 元素、 <span>、 <em> 以及 <strong> 都是默认处于 inline 状态的。
我们通过对盒子display属性的设置,比如inline或者block,来控制盒子的外部显示类型。
内部显示类型
盒子也有内部显示类型,这决定了在盒子内部的元素是如何排列的。
the elements inside a box are also laid out in normal flow and behave as block or inline boxes.
你可以像这样改变内部显示类型:display: flex;。这个元素会继续保持外部显示类型为block但是内部显示类型会变为flex。任何直接子元素会变成flexitems然后behave according to the Flexbox specification.
内部显示类型有flex和grid等。
备注: 想要了解更多有关显示值以及盒子在块和内联布局中的工作原理,请参阅常规流中的块和内联布局。
不同显示类型的盒子
你可以修改 display: inline 为 display: block 或者 display: inline-flex 改为 display: flex 来观察显示模式切换。
p,
ul {
  border: 2px solid rebeccapurple;
}

span,
li {
  border: 2px solid blue;
}

ul {
  display: inline-flex;
  list-style: none;
  padding: 0;
}

.inline {
  display: inline;
}
<p>
    I am a paragraph. Some of the
    <span>words</span> have been wrapped in a
    <span>span element</span>.
</p>
<ul>
  <li>Item One</li>
  <li>Item Two</li>
  <li>Item Three</li>
</ul>
<p class="inline">I am a paragraph. A short one.</p>
<p class="inline">I am another paragraph. Also a short one.</p>
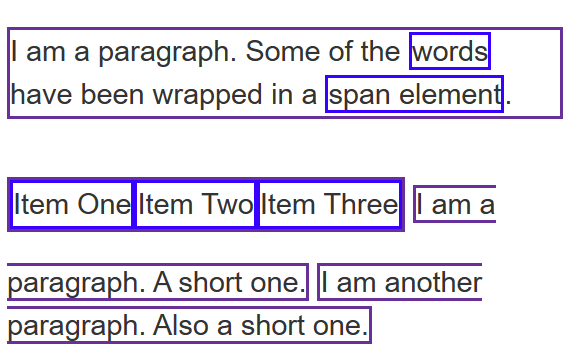 所以:
所以:display属性可以改变盒子的外部显示类型是块级还是内联,这将会改变它与布局中的其他元素的显示方式。
剩下的内容,我们会专注于外部显示类型。
CSS盒模型
完整的CSS盒模型应用于块级盒子,内联盒子只使用盒模型中定义的部分内容。模型定义了盒的每个部分 —— margin, border, padding, and content
为增加复杂性,there is a standard and an alternate box model(IE). By default, browsers use the standard box model.
盒模型的各个部分
CSS 中组成一个块级盒子需要:
- Content box: 这个区域是用来显示内容,大小可以通过设置
width和height. - Padding box: 包围在内容区域外部的空白区域;大小通过
padding相关属性设置。 - Border box: 边框盒包裹内容和内边距。大小通过
border相关属性设置。 - Margin box: 这是最外面的区域,是盒子和其他元素之间的空白区域。大小通过
margin相关属性设置。
如图:

标准盒模型
在标准模型中,如果你给盒设置 width 和 height,实际设置的是 content box。padding 和 border 再加上设置的宽高一起决定整个盒子的大小。见下图。
假设定义了 width, height, margin, border, and padding:
.box {
  width: 350px;
  height: 150px;
  margin: 25px;
  padding: 25px;
  border: 5px solid black;
}
如果使用标准模型,实际占用空间的宽高分别为:宽度 = 410px (350 + 25 + 25 + 5 + 5),高度 = 210px (150 + 25 + 25 + 5 + 5)。
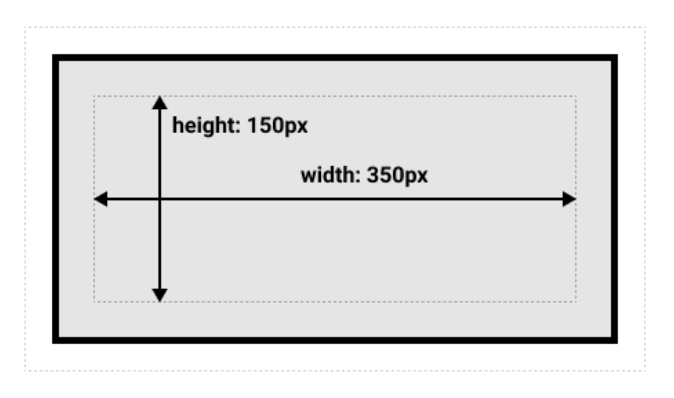
备注: margin 不计入实际大小 —— 当然,它会影响盒子在页面所占空间,但是影响的是盒子外部空间。盒子的范围到边框为止 —— 不会延伸到 margin。
The alternative CSS box model(IE)
替代模型,所见即所得。你可以通过设置box-sizing: border-box来实现。这样可以告诉浏览器用border-box来定义区域。
.box {
  box-sizing: border-box;
}
如果我们假定盒子和上面提到的那个盒子是一样的样式:
.box {
  width: 350px;
  inline-size: 350px;
  height: 150px;
  block-size: 150px;
  margin: 10px;
  padding: 25px;
  border: 5px solid black;
}
现在盒子实际占用350px长,150px宽。
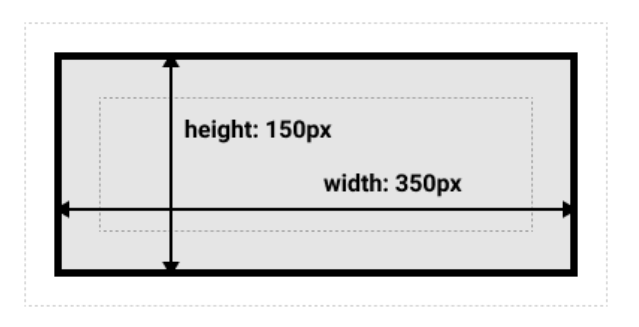
如果你希望所有元素都使用替代模式,(which is a common choice among developers), set the box-sizing property on the <html> element and set all other elements to inherit that value:
html {
  box-sizing: border-box;
}
*,
*::before,
*::after {
  box-sizing: inherit;
}
To understand the underlying idea(潜在理念), you can read the CSS Tricks article on box-sizing.
玩盒模型
设置一个盒子的样式使用替代模型。
使用调试工具来查看盒模型
浏览器开发者工具可以看。

外边距,内边距,边框
你已经在上面的示例中看到了margin、padding和border属性。该示例中使用的是属性的简写,允许我们一次设置盒子的四个边。这些简写等价于分别控制盒子的不同边的普通写法。
接下来,我们更详细地研究这些属性:
外边距
外边距是盒子周围一圈看不到的空间。它会把其他元素从盒子旁边推开。外边距属性值可以为正也可以为负。设置负值会导致和其他内容重叠。无论使用标准模型还是替代模型,外边距总是在计算可见部分后额外添加。
我们可以使用margin属性一次控制一个元素的所有边距,或者每边单独使用等价的普通属性控制:
顺时针从上开始
在下面的示例中,尝试更改外边距的值,来查看当前元素和其包含元素,在外边距设置为正时是如何推开周边元素,以及设置为负时,是如何收缩空间的。
.box {
  margin-top: -40px;
  margin-right: 30px;
  margin-bottom: 40px;
  margin-left: 4em;
}
<div class="container">
  <div class="box">Change my margin.</div>
</div>
当上面样式中
margin-top的样式是0时
由此可见,正数向里,0吸附,负数向外。
外边距折叠
我们有两个段落。顶部段落的页 margin-bottom为 50px。第二段的margin-top 为 30px。因为外边距折叠的概念,所以框之间的实际外边距是 50px,而不是两个外边距的总和。
只取两个中最大的那个。
.one {
  margin-bottom: 50px;
}

.two {
  margin-top: 30px;
}
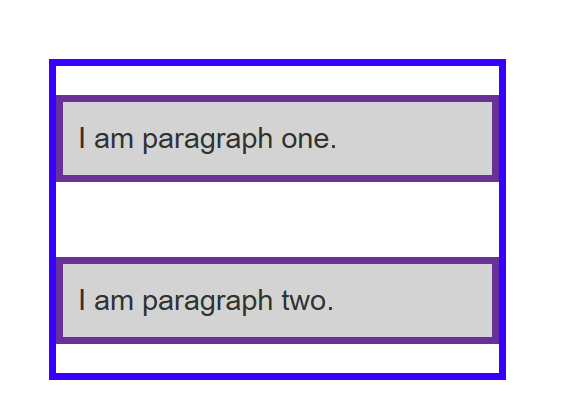
有许多规则规定了什么时候外边距会折叠,什么时候不会折叠。相关更多信息,请参阅外边距重叠。
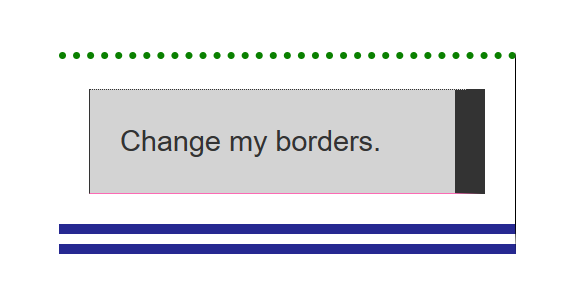
边框
边框是在边�距和填充框之间绘制的。如果你正在使用标准的盒模型,边框的大小将添加到框的宽度和高度。如果你使用的是替代盒模型,那么边框的大小会使内容框更小,因为它会占用一些可用的宽度和高度。
为边框设置样式时,有大量的属性可以使用——有四个边框,每个边框都有样式、宽度和颜色,我们可能需要对它们进行操作。
可以使用border属性一次设置所有四个边框的宽度、颜色和样式。
分别设置每边的宽度、颜色和样式,可以使用: 顺时针从上开始
设置所有边的颜色、样式或宽度,请使用以下属性:
设置单边的颜色、样式或宽度,可以使用最细粒度的普通属性之一:
border-top-widthborder-top-styleborder-top-colorborder-right-widthborder-right-styleborder-right-colorborder-bottom-widthborder-bottom-styleborder-bottom-colorborder-left-widthborder-left-styleborder-left-color
示例:
.container {
  border-top: 5px dotted green;
  border-right: 1px solid black;
  border-bottom: 20px double rgb(23,45,145);
}

.box {
  border: 1px solid #333333;
  border-top-style: dotted;
  border-right-width: 20px;
  border-bottom-color: hotpink;
}
<div class="container">
  <div class="box">Change my borders.</div>
</div>
内边距
内边距位于边框和内容区域之间。与外边距不同,你不能有负数量的内边距,所以值必须是 0 或正的值。 应用于元素的任何背景都将显示在内边距后面,内边距通常用于将内容推离边框。
我们可以使用padding简写属性控制元素所有边,或者每边单独使用等价的普通属性:
如果在下面的示例中更改类.box的内边距值,你可以看到��,这将更改文本开始的位置。
你还可以更改类.container的内边距,这将在容器和方框之间留出空间。任何元素上的内边距都可以更改,并在其边界和元素内部的任何内容之间留出空间。
.box {
  padding-top: 0;
  padding-right: 30px;
  padding-bottom: 40px;
  padding-left: 4em;
}

.container {
  padding: 20px;
}
<div class="container">
  <div class="box">Change my padding.</div>
</div>
盒子模型和内联盒子
以上所有的方法都完全适用于块级盒子。有些属性也可以应用于内联盒子,例如由<span>元素创建的那些内联盒子。
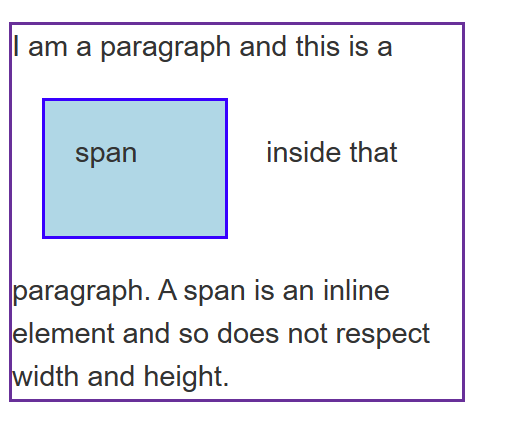
在下面的示例中,我们在一个段落中使用了<span>,并对其应用了宽度、高度、边距、边框和内边距。可以看到,宽度和高度被忽略了。外边距、内边距和边框是生效的,但它们不会改变其他内容与内联盒子的关系,因此内边距和边框会与段落中的其他单词重叠。
span {
  margin: 20px;
  padding: 20px;
  width: 80px;
  height: 50px;
  background-color: lightblue;
  border: 2px solid blue;
}
<p>
    I am a paragraph and this is a <span>span</span> inside that paragraph. A span is an inline element and so does not respect width and height.
</p>

使用display: inline-block
display 有一个特殊的值,它在内联和块之间提供了一个中间状态。这对于以下情况非常有用:你不希望一个项切换到新行,但希望它可以设定宽度和高度,并避免上面看到的重叠。
一个元素使用 display: inline-block,实现我们需要的块级的部分效果:
- 设置
width和height属性会生效。 padding,margin, 以及border会推开其他元素。
但是,它不会跳转到新行,如果显式添加 width 和 height 属性,它只会变得比其内容更大。
在下一个示例中,我们将 display: inline-block 添加到 <span> 元素中。尝试将此更改为 display: block 或完全删除行,以查看显示模型中的差异。
span {
  margin: 20px;
  padding: 20px;
  width: 80px;
  height: 50px;
  background-color: lightblue;
  border: 2px solid blue;
  display: inline-block;
}
<p>
    I am a paragraph and this is a <span>span</span> inside that paragraph. A span is an inline element and so does not respect width and height.
</p>
当你想要通过添加内边距使链接具有更大的命中区域时,这是很有用的。<a> 是像 <span> 一样的内联元素;你可以使用 display: inline-block 来设置内边距,让用户更容易点击链接。
这种情况在导航栏中很常见。下面的导航使用 flexbox 显示在一行中,我们为 <a> 元素添加了内边距,因为我们希望能够在 <a> 在鼠标移动到上面时改变背景色。内边距似乎覆盖了 <ul> 元素上的边框。这是因为 <a> 是一个内联元素。
使用 .links-list a 选择器将 display: inline-block 添加到样式规则中,你将看到它是如何通过内边距推开其他元素来修复这个问题的。
.links-list a {
  background-color: rgb(179,57,81);
  color: #fff;
  text-decoration: none;
  padding: 1em 2em;
}

.links-list a:hover {
  background-color: rgb(66, 28, 40);
  color: #fff;
}
<nav>
  <ul class="links-list">
    <li><a href="">Link one</a></li>
    <li><a href="">Link two</a></li>
    <li><a href="">Link three</a></li>
  </ul>
</nav>